Data is everywhere, but making sense of it? That’s where many people struggle. Enter Microsoft Power BI — a powerful business intelligence tool designed to transform raw data into interactive, easy-to-understand dashboards. No programming skills required!
Whether you’re monitoring company performance, analyzing academic results, or building automated reports, Microsoft Power BI offers a streamlined, user-friendly experience for both beginners and pros.
In this guide, you’ll learn:
- How to install Microsoft Power BI the right way
- How to optimize it for performance
- Smart shortcuts, troubleshooting tips, and advanced tricks for visualizing your data
✅ Step 1: Prepare Your PC for Microsoft Power BI
Before you install anything, let’s make sure your computer is compatible. This helps avoid slowdowns and errors during installation.
Minimum System Requirements:
- Operating System: Windows 10 (64-bit, version 1909 or later)
- RAM: 4 GB minimum (8 GB+ recommended for large datasets)
- Storage: At least 1 GB of free space
- .NET Framework: Version 4.7.2 or higher
💡 Pro Tip: Run Windows Update before installing Power BI to ensure all dependencies are ready. If you’re using an older PC or are limited on RAM, consider installing the 32-bit version. It’s more lightweight but may lag with complex reports.
✅ Step 2: Download Microsoft Power BI Securely
There are two main ways to download Microsoft Power BI Desktop, each with its benefits.
🔹 Method 1: Microsoft Store (Best for Beginners)
- Open the Microsoft Store from the Start Menu
- Search for “Power BI Desktop”
- Click Get and let the app install automatically
Why use this method?
Automatic background updates ensure you always have the latest features without needing to reinstall manually.
🔹 Method 2: Official Website (Advanced Control or Offline Use)
- Visit the official Power BI Download Page
- Click Advanced download options
- Choose one:
- PBIDesktopSetup_x64.exe for 64-bit systems
- PBIDesktopSetup_x86.exe for 32-bit systems
- Right-click and run the installer as Administrator
🛡️ This method is ideal for system admins or if you want to install Microsoft Power BI without relying on the Store (for offline or corporate setups).
✅ Step 3: Install Microsoft Power BI Like a Pro
Once you’ve downloaded the installer:
- Right-click → Select Run as Administrator to prevent permission issues
- Accept license terms and select your preferred installation location
- Click Finish and launch Power BI from the Start menu or desktop shortcut
Having trouble opening Power BI?
- Disable antivirus temporarily during the install
- Make sure your graphics drivers are up to date
- Try launching in Safe Mode (Hold Ctrl while opening Power BI)
🚀 After Installation: Start Using Microsoft Power BI
Once installed, the real magic begins! Let’s walk through your first Power BI project.
🔹 1. Connect to Your Data
Microsoft Power BI can connect to a wide range of data sources:
- Excel and CSV files
- SQL Server and MySQL databases
- SharePoint, Google Analytics, Azure, and 100+ more
🔍 Try Get Data → Web to pull in live data from APIs or websites.
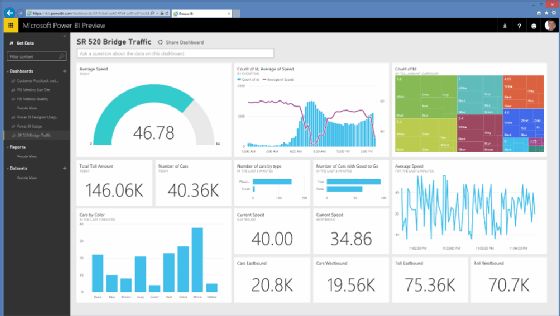
🔹 2. Build Your First Interactive Dashboard
Use the drag-and-drop interface to add:
- Bar charts, line graphs, and pie charts
- Interactive maps and KPI indicators
- Custom tables and slicers for filters
Bonus: Use the Q&A feature to ask natural questions like
“Show me total sales by month,” and Power BI will create a chart for you!
🔹 3. Share Your Reports with Others
- Publish to Power BI Service (free cloud sharing)
- Export to PDF or PowerPoint for email sharing
- Set up scheduled data refreshes for live dashboards
🛠️ Troubleshooting Common Microsoft Power BI Issues
| Problem | Solution |
| .NET Framework error | Update Windows or install .NET 4.7.2 manually |
| Microsoft Store download fails | Run wsreset.exe to reset the Store cache |
| Power BI runs slow | Close other apps, upgrade RAM, or simplify datasets |
| Crashes on launch | Try Safe Mode or check for driver updates |
💡 Power BI Pro Tips for Smarter Reports
✨ Time-Saving Keyboard Shortcuts
- Ctrl + C / Ctrl + V: Copy visuals between pages
- Alt + Click: Select visuals that are layered on top of each other
✨ Advanced Visualization Tricks
- Use Bookmarks to create interactive report navigation
- Set up Drill Through actions for detailed insights
- Apply Conditional Formatting to highlight trends (e.g., red for negative values, green for positive growth)
🧠 Want to Master Microsoft Power BI?
Even though Microsoft Power BI is beginner-friendly, there’s always room to grow. Consider reaching out to your IT support team or a certified Microsoft Partner in Nepal for training and advanced help.
Smart questions to ask your trainer or IT team:
- How can I speed up large data refreshes?
- What’s the best way to automate recurring reports?
- How can I secure my Power BI dashboards from unauthorized access?
🏁 Final Thoughts: Make Your Data Work for You
Microsoft Power BI turns complex data into meaningful stories. Whether you’re a small business owner, analyst, student, or IT professional, learning how to install and use Power BI effectively gives you a major advantage in today’s data-driven world.
From clean installation to data transformation, this tool empowers you to move beyond spreadsheets and into the future of data storytelling. Start analyzing smarter, faster, and better — with Microsoft Power BI.