Upgrading your PHP version isn’t just a technical update — it’s a key move for your website’s performance, security, and compatibility.
Whether you’re chasing faster load times, better plugin support, or tighter security, updating your PHP version through cPanel’s PHP Selector is one of the easiest ways to give your website a boost.

In this step-by-step guide, we’ll walk you through how to change your PHP version safely and effectively.
Why Changing PHP Version Matters
Before diving into the how-to, let’s understand why this matters:
- Speed Boost: Newer PHP versions are significantly faster than older ones.
- Security Updates: Old PHP versions may expose your website to vulnerabilities.
- Better Compatibility: New plugins, CMSs like WordPress, and web applications demand the latest PHP versions for full functionality.
Updating PHP ensures your website is running at its best, both for you and your visitors.
Step-by-Step: How to Change PHP Version Using PHP Selector
Step 1: Log in to your cPanel
- Open your browser and go to your hosting account’s cPanel login page.
Example: `yourdomain.com/cpanel` or `yourdomain.com:2083`
- Enter your cPanel username and password.
If you’re not sure how to find your cPanel login, check your hosting provider’s welcome email or dashboard.
Step 2: Locate the PHP Selector

- Once inside cPanel, use the search bar at the top.
- Type “Select PHP Version”.
- Click on the Select PHP Version icon under the Software section.
This tool lets you control which PHP version your website uses without needing to edit server files manually.
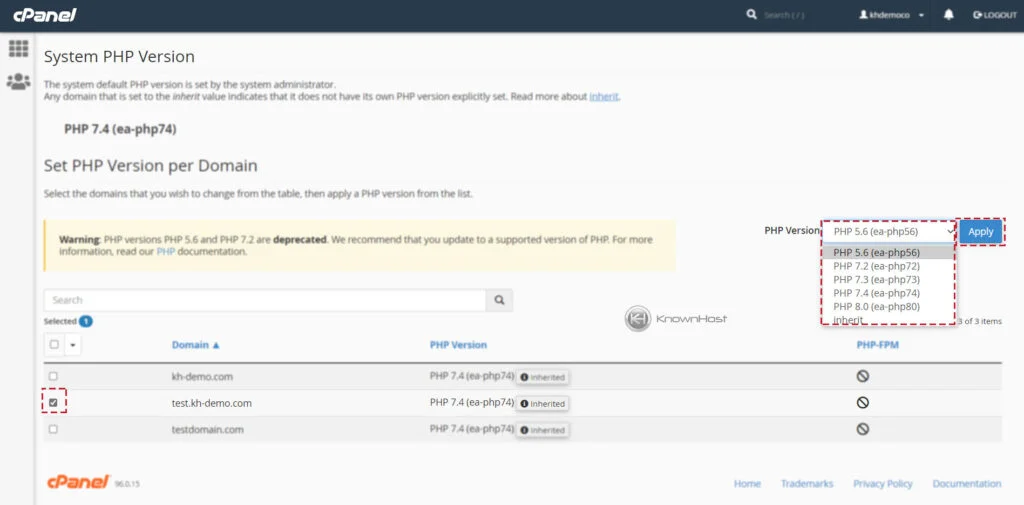
Step 3: Choose Your Preferred PHP Version
- Inside the PHP Selector, you’ll see the current PHP version your site is using.
- Click the drop-down menu to view all available PHP versions (like 7.4, 8.0, 8.1, 8.2, etc.).
- Select the version you want to switch to.
Pro Tip: It’s generally recommended to use the latest stable PHP version unless your CMS or plugins specifically require an older one.
Step 4: Apply the Changes
- After selecting your desired PHP version, click the Apply button.
- Wait a few seconds for the changes to be processed.
Congratulations — your website is now using the new PHP version!
Additional Steps You Might Need (Important)
Check for MultiPHP Manager or .htaccess Settings
If you don’t see changes taking effect:
- Go back to cPanel and check if your PHP version is being forced by MultiPHP Manager or overridden by a .htaccess file.
- If so, you’ll need to update the PHP version using those tools too.
[Learn how to change PHP version via MultiPHP Manager]
[Learn how to update PHP version via .htaccess]
Verify the PHP Version Change
To be 100% sure your site is running the new PHP version:
- Create a new file called `info.php`.
- Add the following code inside:
“`php
<?php phpinfo(); ?>
“`
- Upload it to your website’s `public_html` or the directory where your site is installed.
- Open your browser and visit `yourdomain.com/info.php`.
You’ll see a page showing all PHP settings — check the PHP Version at the top!
Remember to delete the `info.php` file afterward for security reasons.
Things to Keep in Mind Before and After Changing PHP Version
Plugin & Theme Compatibility:
Some WordPress plugins, Joomla extensions, or older CMS setups might not work perfectly on newer PHP versions.
- Always back up your website before switching.
- Code Deprecation:
Old custom scripts or outdated themes might use deprecated functions.
Test thoroughly after the change.
- Stay Updated:
Running an outdated PHP version exposes your site to hacks. Always aim to stay on a supported and secure version.
FAQs:
1. Why should I update my PHP version?
Updating your PHP version boosts your website’s speed, enhances security, and ensures better compatibility with modern plugins, CMS platforms like WordPress, and web applications.
2. Where can I find the PHP Selector in cPanel?
After logging into cPanel, use the search bar and type “Select PHP Version.” You’ll find it under the Software section — it lets you easily choose your preferred PHP version.
3. What PHP version should I choose?
It’s generally best to select the latest stable PHP version (such as PHP 8.2 or above) for maximum performance and security — unless your site’s plugins or CMS require an older version.
4. Will changing the PHP version break my website?
If your plugins, themes, or custom code are outdated, switching to a newer PHP version might cause issues. Always back up your site first and test thoroughly after updating.
5. How can I verify that my PHP version has changed?
Create a simple info.php file with the <?php phpinfo(); ?> code, upload it to your website’s directory, and visit it via your browser. This will display your current PHP settings.
6. What if changing PHP in PHP Selector doesn’t work?
Your site may be controlled by MultiPHP Manager or overridden by a .htaccess file. In that case, you’ll need to update the PHP version using those tools as well.
7. Is it safe to leave the info.php file on my server?
No, it’s not safe. After verifying your PHP version, immediately delete the info.php file to prevent exposing sensitive server information to hackers.
8. Can I revert to an older PHP version if something breaks?
Yes. Simply go back to PHP Selector, choose the previous working version from the dropdown menu, and click Apply.
9. Do I need to restart my website after changing PHP versions?
No manual restart is needed. Changes take effect automatically after you apply the new PHP version through the PHP Selector.
10. How often should I update my PHP version?
Check for PHP updates at least once or twice a year. Always aim to run a supported and actively maintained version to protect your website from vulnerabilities.
Conclusion
Changing your PHP version using cPanel’s PHP Selector is one of the quickest ways to future-proof your website. You not only gain speed and security, but you also set your site up for success in the long run.
Whether you’re a beginner managing your first site or a developer optimizing client websites, knowing how to adjust your PHP environment gives you a serious advantage.
Keep learning, keep upgrading — your website deserves it!