WordPress is one of the best tools you can use if you’re thinking about launching your own blog, business site, or portfolio. It’s powerful, flexible, and surprisingly easy to set up -even if you’re new to websites!

In this guide, we’ll walk you through the full step-by-step process of installing WordPress through cPanel, the most common hosting dashboard. By the end, you’ll have your WordPress website live and ready for customization -no tech wizardry required!
What You’ll Need Before We Start
Before diving in, make sure you have these basics ready:
- Hosting with cPanel access (your hosting company should provide a cPanel login)
- A domain name connected to your hosting account
- (Optional) An SSL certificate is required if you want your website to use HTTPS (recommended for security)
If you have all three, you’re good to go!
Step 1: Logging into Your cPanel Dashboard

- First things first log in to your cPanel account.
- You can usually access it by typing your domain followed by `/cpanel`, like this:
“`
yourdomain.com/cpanel
“`
- Enter your username and password provided by your hosting company.
- Once logged in, you’ll see a control panel with lots of tools -don’t worry, you’ll only need a few of them for now.
Step 2: Finding the WordPress Installer
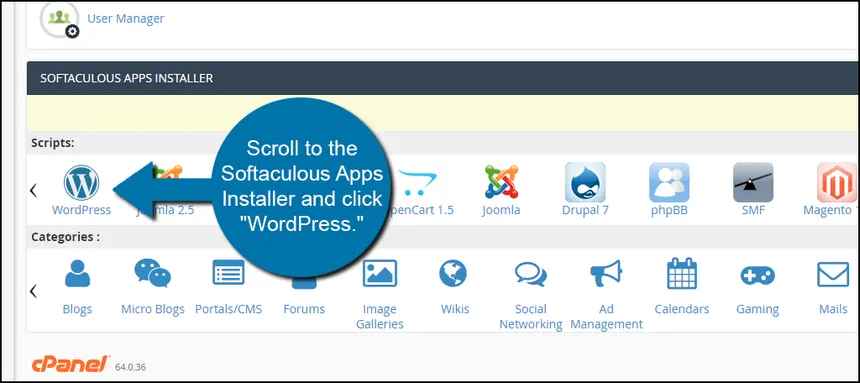
Most hosting providers simplify installing WordPress by offering a one-click installer through tools like Softaculous Apps Installer or sometimes directly labeled as WordPress Manager.
Here’s how to find it:
- Scroll down to the Software section inside cPanel.
- Look for an option like “WordPress“, “Softaculous Installer“, or “Apps Installer“.
- Click the WordPress logo or link.
> Tip: If you can’t find it, use the cPanel search bar at the top to search for “WordPress.”
Step 3: Starting the WordPress Installation
After opening the WordPress installer:
- Click on Install Now to start a new WordPress setup.
- You’ll be taken to a setup page where you need to configure your WordPress site.
Let’s break it down carefully.
Step 4: Setting Up WordPress Configuration
Here’s what you’ll fill out:
Software Setup
- Choose Protocol:
->If you have an SSL certificate, select `https://`.
->If not, stick with `http://`.
- Choose Domain:
->Pick the domain name you want WordPress installed on.
- In Directory:
->Leave this blank if you want WordPress to load when someone visits your domain directly (recommended).
->If you type something here like `blog`, WordPress will be installed at `yourdomain.com/blog`.
Site Settings
- Site Name:
->Choose a name for your website (you can change it later).
- Site Description:
->Write a short tagline or leave it for now.
Admin Account
- Admin Username:
->Create a username you’ll use to log into WordPress. (Avoid “admin” for security reasons!)
- Admin Password:
->Choose a strong password (use numbers, symbols, uppercase, and lowercase).
- Admin Email:
->Provide an email you’ll have access to (for password recovery, updates).
Database Settings (Advanced users can customize, but defaults are usually fine)
- Database Name:
->Auto-filled. You can leave it unless you want a custom one.
- Table Prefix:
->Recommended to leave as default unless you know why you need to change it.
Step 5: Installing WordPress
Once you’ve filled everything out:
->Scroll down and hit the Install button.
->The installer will begin setting up your WordPress site -this may take a minute or two.
DO NOT close your browser until it finishes.
Step 6: Accessing Your New WordPress Website
Once installed, you’ll get two important links:
- Website URL -where visitors will see your new site.
- Admin URL -where you log in to manage the site (usually looks like `yourdomain.com/wp-admin`).
> Pro Tip: Bookmark your WordPress Admin Login Page for quick access later!
Bonus: Common Post-Installation Tips
Now that WordPress is installed, here are a few extra tips:
- Log in to your WordPress dashboard and explore themes to change how your site looks.
- Install important plugins like security, backup, and SEO tools.
- Update WordPress core, themes, and plugins regularly to keep your site safe.
FAQs:
1. What is cPanel, and why is it used to install WordPress?
cPanel is a popular web hosting control panel that provides a user-friendly interface to manage your website, files, and databases. It simplifies the process of installing WordPress with just a few clicks using tools like Softaculous or WordPress Manager.
2. Can I install WordPress without using Softaculous in cPanel?
Yes, you can manually install WordPress via cPanel by uploading the WordPress files, creating a database using MySQL, and editing the wp-config.php file. However, using Softaculous or an installer is faster and easier for beginners.
3. Where can I find my WordPress login URL after installation?
Once installed, your WordPress admin login URL is typically:
yourdomain.com/wp-admin
Use the username and password you created during the installation to log in.
4. What if I don’t see WordPress or Softaculous in my cPanel?
If WordPress or the Softaculous installer isn’t visible in your cPanel, use the search bar at the top. If it still doesn’t appear, contact your hosting provider to ensure it’s included in your hosting plan.
5. Do I need to install WordPress in a subdirectory like /blog?
No, unless you want your WordPress site to be accessible at yourdomain.com/blog. Leave the “In Directory” field blank during installation if you want WordPress on your main domain (yourdomain.com).
6. Is it safe to use the default database settings during WordPress installation?
Yes, for most users, the default database name and table prefix are fine. However, for enhanced security, advanced users sometimes customize these settings to avoid SQL injection vulnerabilities.
7. Can I change my site name and admin details later?
Absolutely. You can change your site name, tagline, admin email, and even the admin password from your WordPress dashboard after installation.
8. Do I need an SSL certificate before installing WordPress?
No, but it’s highly recommended. If you install an SSL later, you can still switch your WordPress URL from http to https through WordPress settings or your hosting dashboard.
9. What should I do after installing WordPress?
Start by logging into your dashboard, picking a theme, installing essential plugins (like SEO, security, and backups), and updating your settings. Also, delete any default posts and pages to start fresh.
10. Is WordPress free to install and use through cPanel?
Yes, WordPress is open-source and free to use. Most hosting plans include WordPress auto-installers at no extra cost, although you’ll pay for the hosting and domain.
Final Thoughts
And that’s it – you’ve successfully installed WordPress using cPanel! 🎉
Now the fun part begins: designing your site, creating content, and building your online presence.
Setting up WordPress might seem intimidating at first, but as you’ve seen, it’s actually straightforward when you break it down. Stay curious, keep experimenting, and soon, you’ll have a beautiful site you can proudly call your own!