Introduction
Keeping your website’s PHP version up-to-date is crucial for better performance, improved security, and broader compatibility with modern applications and frameworks.
Thanks to cPanel’s MultiPHP Manager, you can easily manage and switch PHP versions for your domain or subdomains without touching a single line of server code.
This guide will walk you through everything — from basic steps to important considerations — so you can make PHP changes like a pro!
Why You Might Need to Change PHP Versions
- Improve Website Speed: Newer PHP versions often come with significant performance upgrades.
- Fix Compatibility Issues: Some scripts or CMS platforms (like WordPress) require specific PHP versions.
- Enhance Security: Outdated PHP versions no longer receive security updates, making your site vulnerable.
- Access New Features: Latest PHP releases come with new language features and syntax improvements that can benefit your codebase.
How to Change PHP Version Using MultiPHP Manager
Step 1: Log in to your cPanel Account
Access your hosting account’s cPanel interface.
You can usually get there by typing:
“`
yourdomain.com/cpanel
“`
or
“`
yourdomain.com:2083
“`
Use your cPanel username and password provided by your hosting provider.
Step 2: Open the MultiPHP Manager
Once logged in, navigate to the “Software” section and click on “MultiPHP Manager“.
> Tip: Use the search bar at the top of cPanel to quickly locate it.
What is MultiPHP Manager?
MultiPHP Manager is a cPanel tool that lets you assign different PHP versions to different domains, subdomains, or addon domains on the same hosting account.
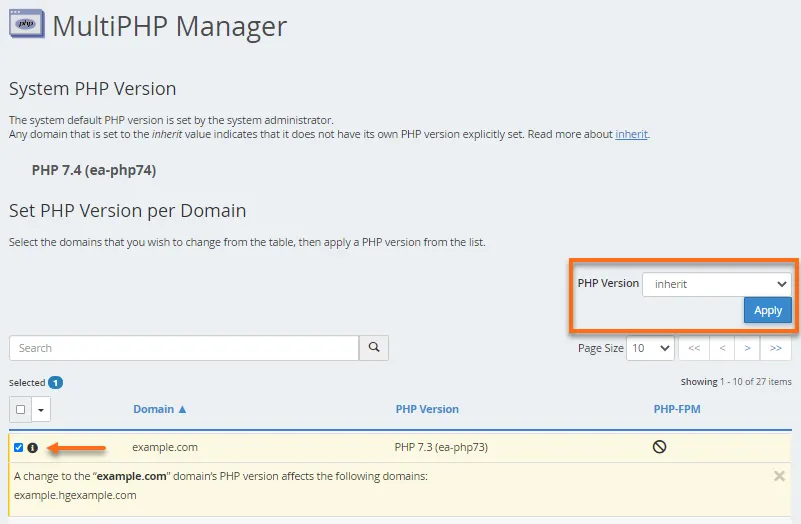
Step 3: Select the Domain(s) You Want to Modify
Inside MultiPHP Manager:
- You’ll see a list of all your domains.
- Tick the checkbox next to the domain or subdomain you wish to change.
You can select multiple domains at once if you want them to use the same PHP version.
Step 4: Choose Your Desired PHP Version
On the right-hand side, you’ll find a dropdown labeled PHP Version.
- Click it to view all available PHP versions provided by your hosting server (e.g., 7.4, 8.0, 8.1, 8.2, etc.)
- Choose the version that suits your project’s requirements.
Pro Tip: Always pick the latest stable version unless your website needs a specific older version.
Step 5: Apply Changes
After selecting the appropriate PHP version:
->Click the Apply button.
Your domain will now immediately start using the selected PHP version.
✅ That’s it! No downtime, no server restart needed — changes are almost instant.
Important Points to Remember
Watch for Conflicts
If your PHP version was previously forced via:
- PHP Selector (available in some hosting environments)
- Custom rules in .htaccess files
Those settings might override MultiPHP Manager’s configuration.
You might need to remove those rules or adjust them manually.
Check the Current PHP Version
After applying the change, confirm it by:
- Creating a simple file like `info.php` in your `public_html` directory with the content:
“`php
<?php phpinfo(); ?>
“`
- Open it in your browser:
“`
yourdomain.com/info.php
“`
The page will display detailed PHP settings, including the active version.
Troubleshooting Tips
1. Website Errors After Version Change?
→ Some plugins, CMS themes, or custom scripts may break if they aren’t compatible with the new PHP version. Revert to the older working version if necessary.
2. Can’t Find MultiPHP Manager?
→ Some hosting providers hide it. Contact your host’s support or check if your plan includes PHP version management features.
3. “Handler” Errors After Change?
→ This usually means `.htaccess` is still forcing an old PHP version. Edit or remove any outdated handler lines manually.
Best Practices When Updating PHP Versions
1. Test in a Staging Environment First
Always try the new PHP version on a staging copy of your site to spot any issues early.
2. Backup Before Changes
Always take a full backup (files + database) before changing your PHP settings.
3. Update Themes and Plugins
Outdated plugins and themes are the main source of incompatibility issues. Keep everything updated!
4. Schedule Regular Checks
Review PHP updates at least every 6 months to keep your site healthy and secure.
Final Thoughts
Switching PHP versions used to be a complicated task, but with cPanel’s MultiPHP Manager, it’s a breeze!
Upgrading to newer PHP versions not only boosts performance but also protects your website from vulnerabilities.
Don’t let outdated PHP slow you down or leave your site exposed.
With this step-by-step guide, you’re now fully equipped to manage your PHP versions like a seasoned pro.
Happy coding and faster websites ahead!