
If you’re moving to a new hosting provider, setting up a fresh server, or simply tweaking your domain’s routing, updating DNS settings is a crucial step. This practical, no-fluff guide walks you through the entire process, whether you’re using GoDaddy, Namecheap, Cloudflare, or a regional registrar like Nest Nepal.
What Are Nameservers?
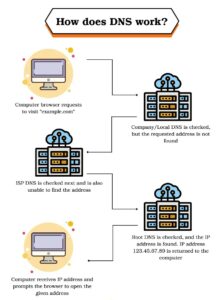
Nameservers are part of the Domain Name System (DNS) that connect your domain name to the correct web server. They act as internet traffic controllers, directing visitors to the right hosting provider.
Whenever you change DNS records, you’re effectively switching control from your domain registrar to your new hosting service or DNS management provider.
💡In simple terms: If your domain is a street address, nameservers are the GPS that tell browsers where to go!
Before You Start: What You’ll Need
- Access to your domain registrar’s dashboard (e.g., Namecheap, GoDaddy, Google Domains)
- The updated DNS details from your hosting provider (e.g., ns1.example.com, ns2.example.com
- (Optional) Administrator privileges are required if managing domains for an organization
Step-by-Step: Updating Nameservers for Your Domain
1. Log in to your Domain Registrar Account
- Visit your registrar’s website and sign in.
- Navigate to the Domain Manager or My Domains section.
2. Access Domain Management
Find the domain you’re updating and click on its settings.
3. Disable Domain Lock (if required)
- Some registrars enable domain lock (also called “transfer protection”) by default.
- If changes are restricted, disable the lock before proceeding.
4. Find DNS or Nameserver Settings
- Look for DNS Management, Custom DNS, or Advanced Settings in your dashboard.
- If your domain is set to “Use Registrar’s Default DNS,” switch to Custom Nameservers.
5. Enter Your New Nameservers
Input the new nameserver values exactly as provided by your host. Example:
->ns1.hostingprovider.com
->ns2.hostingprovider.com
Most providers require at least two, so double-check before saving.
6. Save Changes
- Click Save, Apply, or Update (terms vary by registrar).
- Some platforms may send an email confirmation for security verification.
7. Re-enable Registrar Lock (Recommended)
If you disabled the registrar lock earlier, turn domain protection back on to prevent unauthorized changes.
DNS Propagation: What to Expect
DNS changes aren’t instant. It can take up to 48 hours for the new nameservers to propagate globally. During this time:
- Your website may go offline intermittently
- Services like email could be affected
Use tools like DNSChecker.org or dig/nslookup in your terminal to monitor propagation.
-> Check nameservers using dig
$ dig NS yourdomain.com
-> Check from multiple resolvers
$ nslookup -type=ns yourdomain.com 1.1.1.1
Optional but Smart: Use a Script to Validate Setup
Once DNS is live, use a shell script to confirm all services are working. For example:
!/bin/bash
DOMAIN=”yourdomain.com”
echo “Checking DNS resolution for $DOMAIN…”
dig +short NS $DOMAIN
ping -c 4 $DOMAIN
Pro Tips & Considerations
- Always double-check your nameserver spelling. Typos can bring your site down.
- Keep a backup of your old nameservers before making changes.
- Don’t delete DNS records until the new ones are confirmed as working.
- Use a status page or monitor to track outages during propagation.
🌐 Where to Find Nameservers for Popular Hosts
| Host | Nameserver Format Example |
| Cloudflare | alice.ns.cloudflare.com, bob.ns.cloudflare.com |
| Hostinger | ns1.dns-parking.com, ns2.dns-parking.com |
| Nest Nepal | ns1.nestnepal.com, ns2.nestnepal.com |
| Bluehost | ns1.bluehost.com, ns2.bluehost.com |
Check your provider’s dashboard or welcome email for the actual values.
Common Errors and Fixes
| Issue | Fix |
| Domain not resolving | Wait for propagation or check the spelling of NS records |
| Email stopped working | Recheck that the MX records are configured correctly post-switch |
| Can’t update NS | Disable the domain lock or check the registrar support limits |
FAQs:
1. What are nameservers, and why are they important?
Nameservers are part of the DNS system that direct internet traffic to your domain’s hosting provider. They’re essential for making your website, emails, and online services accessible to the world.
2. How do I find my hosting provider’s nameservers?
You can usually find your nameservers in your hosting provider’s dashboard or welcome email. If you’re unsure, contact their support or check their help center for documentation.
3. How long does it take for name server changes to take effect?
Nameserver changes typically take 24 to 48 hours to fully propagate worldwide, though changes may reflect sooner in some regions.
4. Will my website go down during DNS propagation?
Your website may experience intermittent downtime or inconsistencies during propagation. This is normal and usually resolves once the update completes.
5. Can I change nameservers without affecting email services?
Yes, but you must ensure all existing DNS records (like MX records) are properly transferred or reconfigured on the new host before switching nameservers.
6. Is it safe to change nameservers myself?
Yes, changing nameservers is safe if done correctly. Just double-check the entries and ensure you copy any essential DNS records before making changes.
7. What if my domain registrar won’t let me change nameservers?
Check if the domain is locked or protected. You’ll need to disable the domain lock or contact support to unlock editing features.
8. Can I use Cloudflare or a third-party DNS with my domain?
Absolutely. Services like Cloudflare, Google DNS, or Nest Nepal DNS allow you to manage DNS externally. Just update the nameservers accordingly at your registrar.
9. Do I need to delete old DNS records after switching nameservers?
Only delete old records once you’ve verified that the new setup is working properly. Keeping a backup is recommended.
10. How do I know if my nameserver update was successful?
Use tools like DNSChecker.org, dig, or nslookup to verify that your domain is pointing to the correct nameservers.
Conclusion
Updating nameservers is a basic yet powerful move when managing a domain. Whether you’re migrating to a better host, improving speed with Cloudflare, or just cleaning up DNS, the process is safe—if done right.
Just remember:
✔ Be patient – DNS changes take time.
✔ Keep backups – in case you need to revert.
✔ Monitor the transition – avoid unexpected downtime.
Be patient with propagation, double-check your data, and you’ll keep your digital presence clean and sharp.